
Table of Contents
- Rescreening vs Replacing Window Screens: Quick Comparison
- Signs of Window Screen Frame Damage That Determine Your Choice
- Types of Window Screen Mesh Materials and Their Performance
- Cost of Professional Window Screen Repair vs Full Replacement
- How to Rescreen Your Window: Step-by-Step Process
- When to Replace Window Screens Entirely
- DIY vs Professional: Making the Right Decision
- Conclusion
Last Updated: August 20, 2026
Rescreening vs Replacing Window Screens: Quick Comparison
When your window screens start showing their age, you face a straightforward decision: patch them up or replace them entirely. The answer depends on the damage extent, frame condition, and your long-term comfort goals. At SPARKLE TECH SUN SCREENS, we help homeowners understand this choice every day, and the decision tree is simpler than most people think.
Rescreening involves replacing just the mesh, the fiberglass or aluminum fabric that stretches across your frame. Replacing means installing entirely new screens, frame and all. The cost difference is significant, but so is the durability difference. Most homeowners can rescreen damaged window screens in a weekend with basic tools, while full replacement typically requires professional installation for proper fit and performance.
Here’s what matters: rescreening works when your frame is structurally sound but the mesh is torn, punctured, or degraded. Replacement becomes necessary when the frame itself is bent, corroded, or damaged beyond simple repair. Understanding this distinction saves you money and prevents the frustration of investing in a solution that won’t last.
Rescreening vs Replacing Window Screens: Quick Comparison
| Aspect | Rescreening | Replacing |
|---|---|---|
| Best For | Intact frames with damaged mesh | Bent, corroded, or broken frames |
| Time Investment | 1-2 hours per screen (DIY) | Professional installation required |
| Durability | 5-10 years (depends on mesh type) | 10-15+ years with quality frames |
| Difficulty Level | Beginner-friendly | Requires professional expertise |
| When to Choose | Minor tears, punctures, UV degradation | Structural frame damage, multiple issues |
Signs of Window Screen Frame Damage That Determine Your Choice
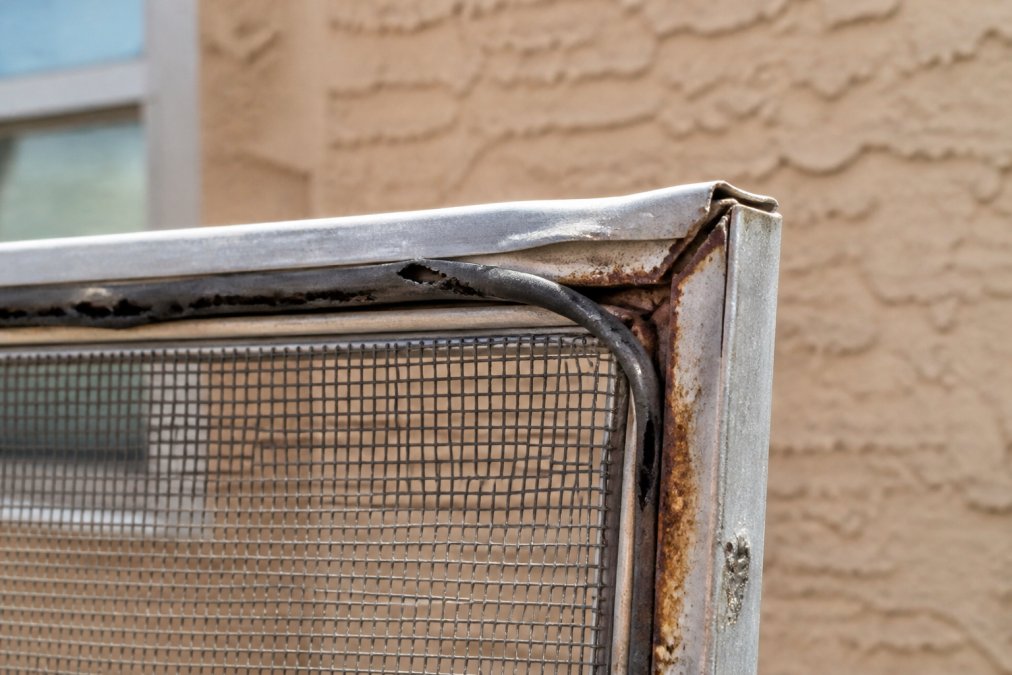
Your frame tells the story. If it’s solid, rescreening makes sense. If it’s compromised, replacement is your only real option.
Visible rust or corrosion is the clearest signal. Aluminum frames don’t rust, but steel fasteners do, especially in dry climates where salt and dust accumulate. Once corrosion takes hold, it spreads. Small rust spots can be sanded and treated, but extensive corrosion means the frame’s structural integrity is compromised. That’s a replace situation.
Bent or warped corners indicate frame damage that rescreening won’t fix. Window screen frames rely on tight corners and straight edges to hold mesh under tension. When corners bend inward or the frame twists, the new mesh you install will never stretch properly. The spline rubber, that rubber cord that holds the mesh in place, won’t seat correctly, leaving gaps where insects slip through.
Cracked or split frame material is non-negotiable. Wood frames can split from sun exposure and temperature cycling. Aluminum frames can crack from impact or stress. Once cracked, the frame loses its ability to hold tension. Rescreening a cracked frame is like patching a tire with a hole in the sidewall, it won’t hold.
Deteriorated spline rubber deserves attention. That rubber cord runs along the frame edge, holding the mesh tight. Over time, Arizona’s intense sun breaks down the rubber, making it brittle and ineffective. If your spline is cracked, hardened, or missing in sections, you have two choices: replace just the spline (part of rescreening) or replace the entire frame. Most professionals recommend full replacement if spline damage is extensive, because new spline works best with new mesh.
Loose or missing fasteners at frame corners suggest the frame is separating. Tighten them first. If they won’t tighten or keep loosening, the screw holes have stripped, another frame replacement signal.
Types of Window Screen Mesh Materials and Their Performance
Not all window screen mesh performs equally. Your choice of mesh type directly affects durability, visibility, and how long you’ll wait before rescreening again.
Fiberglass mesh is the standard. It’s affordable, easy to install, and transparent enough for clear views. Fiberglass stretches smoothly under spline tension and cuts easily with a utility knife. The downside: it degrades under UV exposure. In Arizona’s relentless sun, fiberglass typically lasts 5-7 years before becoming brittle and tearing easily. It’s also vulnerable to pet claws and rough handling. If you have dogs or kids, fiberglass won’t survive long.
Aluminum mesh offers better durability than fiberglass. It resists UV degradation and doesn’t degrade as quickly in intense sunlight. Aluminum screens last 8-10 years in typical conditions. They’re stronger than fiberglass, so they resist pet damage better. The trade-off: aluminum is slightly more visible through the screen, reducing visibility slightly. Installation is similar to fiberglass, though aluminum requires a bit more care during stretching.
Phifer TuffScreen, a vinyl-coated polyester option, is three times stronger than standard fiberglass. It’s specifically designed for high-traffic areas and pet owners. TuffScreen resists tears and punctures dramatically better than either fiberglass or aluminum. The durability premium comes with a 10-year warranty. If you have multiple pets or live in a high-wind area, TuffScreen justifies the extra cost because you won’t rescreen as often.
Solar screens reduce heat transmission and UV exposure while maintaining airflow. These specialized meshes have tighter weaves than standard options, which reduces visibility slightly but provides measurable energy savings in hot climates. Solar screens block 65-90% of solar heat, depending on the specific product. They’re thicker and more durable than standard mesh, often lasting 10-12 years. The cost is higher, but the energy savings and extended lifespan offset the premium for many homeowners.
Pet-resistant mesh combines durability with functionality. These screens use reinforced materials that resist claws and teeth without compromising airflow. They’re ideal if standard mesh tears within months of installation.
Cost of Professional Window Screen Repair vs Full Replacement
The financial comparison drives many decisions. Rescreening costs less upfront, but replacement lasts longer and may be the smarter long-term investment depending on your situation.
Rescreening typically involves purchasing a DIY kit or hiring a professional. DIY kits for standard fiberglass mesh start around $20 and include spline rubber and a spline roller tool. If you’re comfortable with basic hand tools, this is a weekend project. Professional rescreening varies by location and complexity, but expect to invest in materials and labor.
Full replacement means new frames, new mesh, and professional installation to ensure proper fit and tension. This is a more significant investment than rescreening. However, new frames come with warranties, SPARKLE TECH SUN SCREENS offers a lifetime guarantee on qualifying screen services, which means you’re protected against defects and installation issues.
The decision hinges on frame condition. If your frame is sound, rescreening saves money now. If your frame is damaged, spending on rescreening is wasted money because you’ll be replacing the frame within a year or two anyway. Calculate the total cost of rescreening now plus replacement later, then compare it to replacement today.
Consider durability too. A premium mesh like TuffScreen or solar screens might cost more to install initially, but they extend the interval between rescreening projects. Over 20 years, fewer rescreening cycles can save money despite higher per-project costs.
How to Rescreen Your Window: Step-by-Step Process
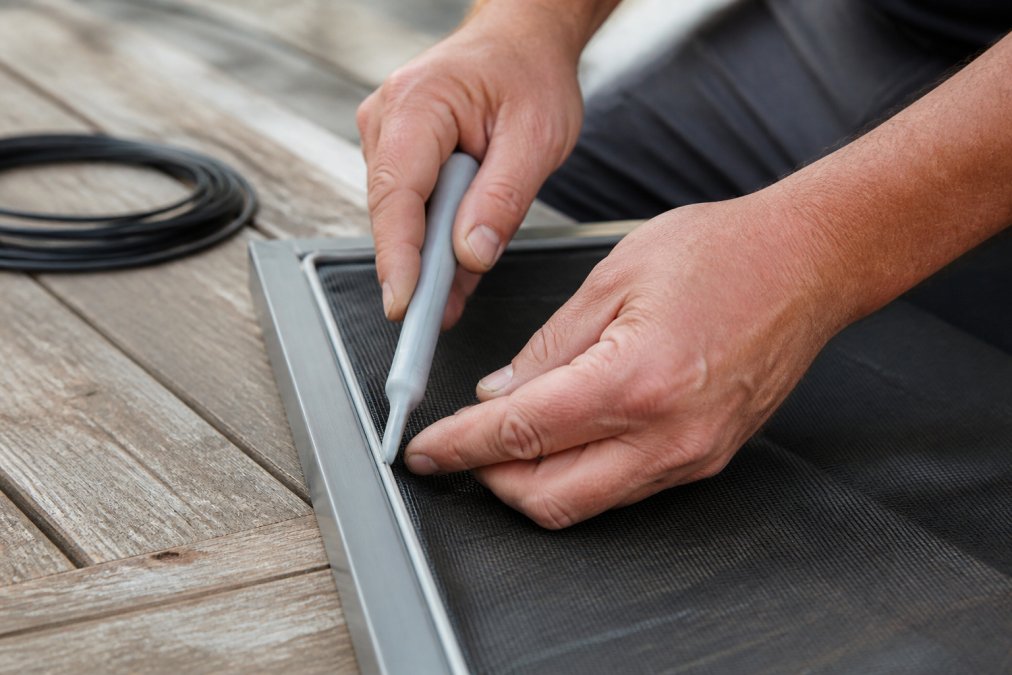
Rescreening is achievable as a DIY project if your frame is in good condition. The process is straightforward and requires minimal tools.
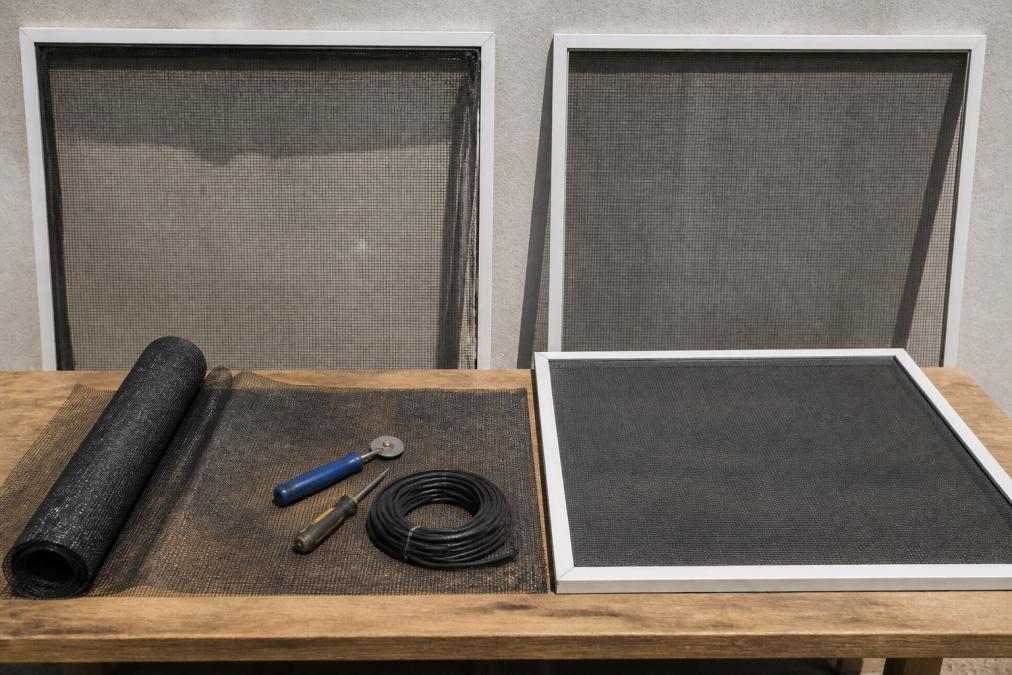
Step 1: Remove the old mesh and spline. Take the screen out of the window and lay it flat on a work surface. Use a flathead screwdriver or spline removal tool to pry out the old spline rubber that holds the mesh in place. Once the spline is out, the old mesh pulls away easily. Clean the frame groove thoroughly to remove any debris or old rubber fragments. A clean groove ensures your new spline seats properly.
Step 2: Cut and position new mesh. Unroll your new mesh and lay it over the frame. Cut it roughly 2 inches larger than the frame on all sides, you’ll trim it flush after installation. Center the mesh over the frame so it’s even on all sides.
Step 3: Install the spline. This is where the spline tool comes in. The spline roller has a concave wheel that presses the rubber spline into the frame groove while simultaneously pressing the mesh into place. Start at one corner and work along one side, pressing firmly and evenly. The spline locks the mesh under tension. Work all four sides, keeping tension consistent. Corners require extra care, press slowly and ensure the spline seats fully.
Step 4: Trim excess mesh. Once the spline is fully installed on all four sides, use a utility knife to trim the excess mesh flush with the frame edge. Cut carefully to avoid nicking the spline rubber or frame.
Step 5: Reinstall the screen. Once trimmed and inspected, reinstall the screen in the window. Check that it rolls smoothly and sits evenly in the frame.
The entire process typically takes 1-2 hours per screen for someone with basic DIY experience. Having a helper makes it easier, one person can hold tension while the other operates the spline tool.
When to Replace Window Screens Entirely
Replacement becomes the right choice when rescreening won’t solve the underlying problem. Several scenarios clearly point toward replacement.
Frame structural damage is the primary trigger. Bent corners, cracked frames, or separated joints mean the frame can’t hold mesh under proper tension. Rescreening a damaged frame is temporary at best. The mesh will sag, gaps will form, and insects will find their way in. You’ll be rescreening again within months.
Widespread corrosion on metal frames indicates the frame material is degrading. Surface rust can be treated, but deep corrosion compromises structural integrity. Replacement prevents future corrosion issues and ensures the new frame will last decades in your climate.
Multiple mesh tears or punctures across the same screen suggest the frame is under stress or the environment is particularly harsh. If you’re rescreening the same screen every year, replacement is more economical over time.
Outdated or incompatible frames may not work with modern mesh options. Older frames sometimes have grooves that don’t accommodate newer, wider mesh types. If you want to upgrade to solar screens or pet-resistant mesh and your current frame can’t accommodate them, replacement is necessary.
Window upgrades often trigger screen replacement. If you’re replacing windows, you’ll need new screens anyway. This is the ideal time to invest in premium mesh and frames that match your new windows.
Energy efficiency goals point toward replacement with solar screens. If you’re serious about reducing heat gain and UV exposure, solar screens installed in new frames perform better than retrofitting old frames.
DIY vs Professional: Making the Right Decision
Both approaches work, but they suit different situations and skill levels.
DIY rescreening makes sense when your frame is solid, the damage is limited to the mesh, and you’re comfortable with basic hand tools. The investment is minimal, a kit costs under $25 for basic fiberglass mesh. The time commitment is a few hours. If you have three screens to rescreen, DIY saves significantly compared to paying for professional labor. However, DIY has limits. Precision matters, if your mesh isn’t stretched evenly, it won’t perform well. Corners require practice to get right. If you’re not confident in your technique, a professional will deliver better results.
Professional installation is worth the investment when your frame is complex, you’re upgrading to specialty mesh like solar screens or TuffScreen, or you want a warranty. Professionals measure precisely, ensuring perfect fit. They have specialized tools that ensure even tension and proper spline seating. They can assess frame condition and recommend repair or replacement. SPARKLE TECH SUN SCREENS offers same-week service and same-day pickup for quotes, which means you’re not waiting weeks for installation.
Consider your climate too. Arizona’s intense sun and dust create harsh conditions. Professional-grade installation and premium mesh last longer and perform better than basic DIY approaches. The warranty protection matters in a climate where screens take a beating.
Your skill level matters. If you’ve successfully completed DIY home projects before, rescreening is manageable. If you’re uncertain about hand tools or precision work, professional installation prevents costly mistakes.
Time availability is practical. Rescreening takes a few hours per screen. If you have the time and enjoy hands-on projects, DIY works. If your schedule is packed, professional installation gets screens done quickly without your involvement.
Frame condition is the deciding factor. If your frame shows any damage, rust, bending, or separation, professional assessment prevents you from wasting money on rescreening when replacement is actually needed.
Before deciding between DIY and professional, inspect your frame carefully. Look for rust, bending at corners, cracks, or loose fasteners. Frame damage makes rescreening futile, you’ll be replacing within months anyway. If the frame is solid, DIY rescreening is economical and straightforward.
Deciding between rescreening and replacing window screens comes down to one question: is your frame sound? If yes, rescreening with quality mesh extends your screens’ life affordably. If your frame shows damage, replacement is the only solution that lasts. In Arizona’s climate, where sun and dust accelerate degradation, investing in professional-grade replacement with a lifetime guarantee protects your home long-term. SPARKLE TECH SUN SCREENS provides custom-fit screens with weather-resistant materials and professional installation to ensure your screens handle extreme sun, wind, and dust. Get your free quote today and discover how durable, professionally installed screens improve your home’s comfort and curb appeal.
Frequently Asked Questions
Is it cheaper to rescreen a window or replace the entire screen?
Rescreening typically costs less upfront because you're only replacing the mesh and spline rubber, not the frame. For a single window, DIY rescreening kits start around $20, while professional rescreening depends on frame size and mesh type. Full replacement involves new frames, hardware, and installation. However, if your frame is damaged by rust or has bent corners, replacement becomes necessary regardless of cost. Visit our pricing page for a custom quote based on your specific windows.
What are the signs of window screen frame damage?
Look for rust spots, especially at frame corners where moisture collects. Bent or warped aluminum frames that won't sit flush in the window track indicate structural damage. Spline rubber that's hardened, cracked, or pulling away from the frame groove cannot hold new mesh securely. If the frame won't close properly or has gaps, the frame itself is compromised. Minor frame damage like small dents may be rescreenable, but extensive corrosion or deep bends require full replacement.
What types of window screen mesh materials are best for Arizona's climate?
Standard fiberglass mesh is affordable and works for most situations, but Arizona's intense sun causes UV degradation over time. Phifer TuffScreen, made from vinyl-coated polyester, is three times stronger than fiberglass and resists tears better, making it ideal for pet owners and harsh weather. Solar screens reduce heat transmission by up to 70%, lowering energy costs while maintaining visibility. Aluminum mesh offers durability but conducts heat. For Arizona homes, pet-resistant or solar mesh options provide better long-term performance despite higher upfront costs.
Can I rescreen a window screen myself, or should I hire a professional?
Small repairs and simple rescreening are DIY-friendly with basic tools like a spline roller and mesh. Screenmend patches work well for minor holes; Phifer repair kits handle larger tears. However, accurate frame measurement, proper mesh tension, and clean spline installation require skill. Mistakes result in loose mesh, poor fit, or visible wrinkles. Professional rescreening ensures custom fit, correct tension, and access to specialty materials like solar or pet-resistant mesh. If your frame is damaged or windows are non-standard sizes, professional service is the safer choice.
How long do rescreened windows last in Arizona heat?
Standard fiberglass mesh typically lasts 3-5 years in Arizona's intense sun due to UV degradation. Upgraded materials like Phifer TuffScreen or solar screens extend lifespan to 7-10 years or more. Professional rescreening with quality materials and proper tension installation improves durability. Frames with rust or corrosion may fail sooner regardless of mesh quality. Our lifetime guarantee on qualifying services ensures your investment is protected against premature failure from workmanship or material defects.
This article was written using GrandRanker