
Table of Contents
- What Causes Patio Screens to Sag
- Tools and Materials You’ll Need
- Step 1: Remove the Sagging Screen from the Frame
- Step 2: Assess Damage and Clean the Screen Frame
- Best Screen Spline Tool and How to Use It
- How to Replace Porch Screen Mesh Properly
- Cost to Rescreen a Porch: What to Expect
- Common Mistakes to Avoid When Fixing Sagging Screens
Last Updated: August 4, 2026
What Causes Patio Screens to Sag
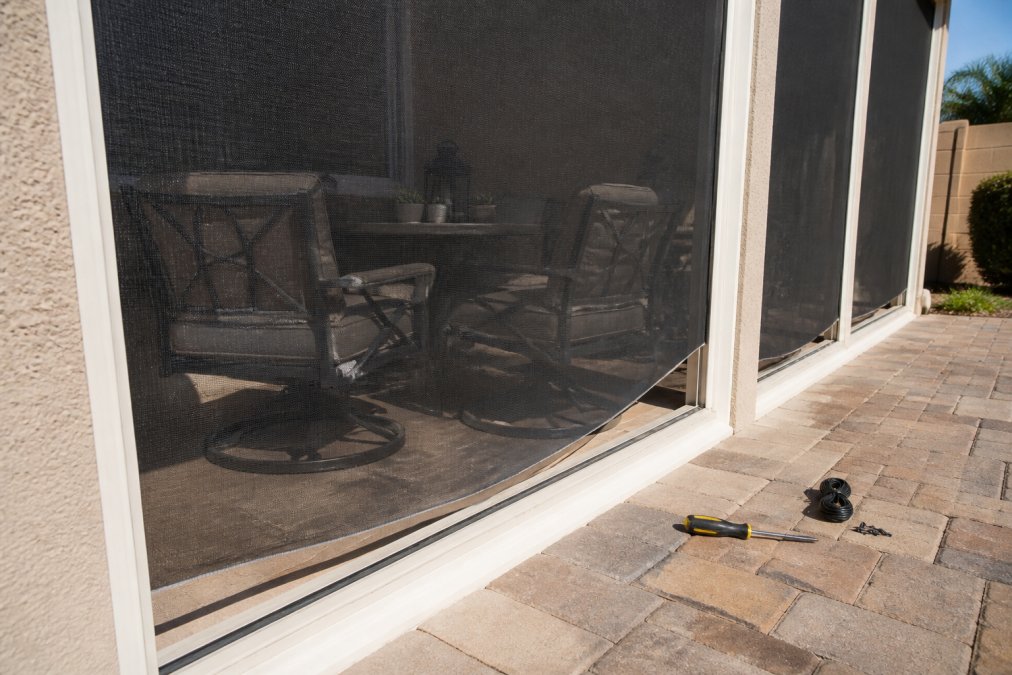
Understanding how to fix sagging patio screens starts with identifying why they fail. Root causes fall into two distinct categories: the screen mesh losing tension over time, or physical damage to the frame or support structure. Arizona’s climate accelerates both failures, intense UV exposure degrades fiberglass mesh, while extreme temperature swings cause aluminum frames to expand and contract unevenly.
Tension loss in screen mesh
Screen mesh loses tension through age, UV degradation, and environmental stress. Fiberglass mesh becomes brittle under Arizona’s relentless sun, and the rubber spline that holds it in place hardens and loses its grip. By year three or four, especially in full-sun exposures, the mesh begins visibly drooping. Temperature cycling is particularly destructive, summer highs exceeding 110°F followed by cooler nights cause the aluminum frame to contract and expand, fatiguing the rubber spline over thousands of cycles. Dust and debris accumulation also degrades the spline by creating micro-abrasions as the mesh flexes.
Frame damage and misalignment
Physical damage to the screen frame creates different sagging patterns. A bent frame corner, warped rail, or misaligned hinges prevents the mesh from sitting flat and evenly tensioned. Common causes include impact, corrosion of aluminum components, and poor initial installation. Misaligned hinges on screen doors cause the entire door to hang crooked, making the mesh appear sagged even if tension is adequate, hinge adjustment often restores proper alignment. Rust and corrosion, though less common in Arizona’s dry climate, still occur on older screens or where moisture collects, compromising structural rigidity.
| Cause | Indicator | Primary Fix |
|---|---|---|
| Mesh tension loss | Even sagging across entire screen | Re-spline the mesh or replace mesh |
| Frame warping | Uneven sagging, visible bends | Frame replacement or straightening |
| Hinge misalignment | Screen door hangs at an angle | Adjust hinges or replace hinges |
| Corrosion | Rust spots, frame weakness | Frame replacement |
Tools and Materials You’ll Need
Fixing sagging patio screens requires specific tools designed for screen work. Attempting repairs with improvised tools typically results in damaged mesh or incomplete spline installation.
Essential repair tools
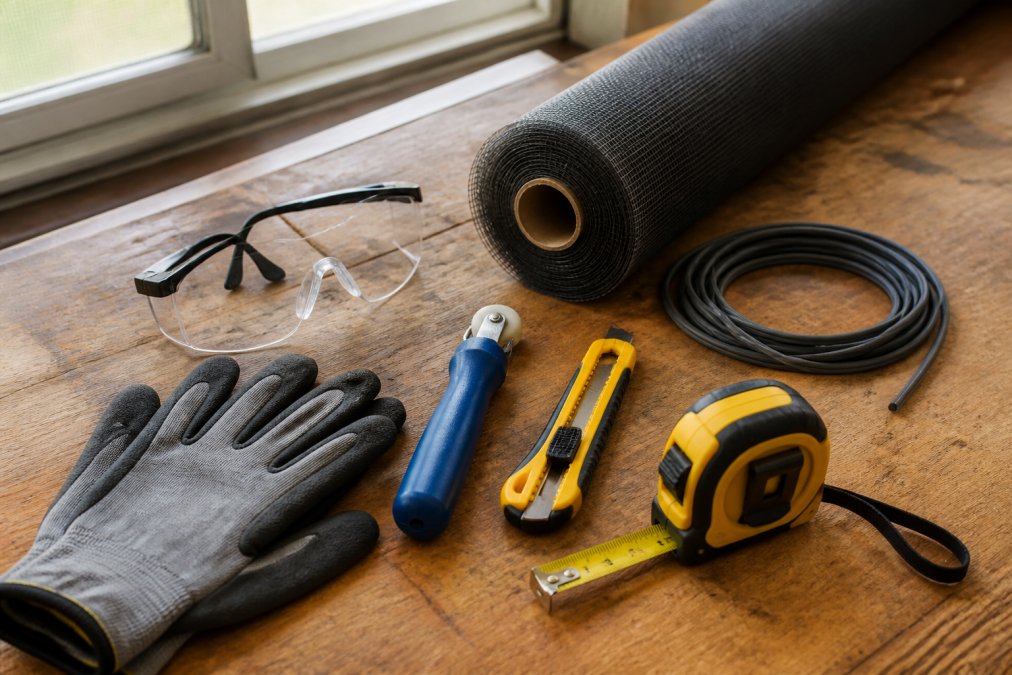
A spline tool is non-negotiable for screen repair. This specialized tool has a concave wheel on one end that presses the rubber spline into the frame groove, and a flat end for trimming excess spline. A utility knife with fresh blades cuts screen mesh cleanly without fraying. A tape measure ensures accurate mesh dimensions, a flathead screwdriver or pry tool removes old spline, and a drill with appropriate bits helps remove fasteners if your screen frame uses clips or screws. A straightedge or level checks frame alignment before you begin. Work gloves protect your hands from sharp screen edges, safety glasses prevent mesh fragments from entering your eyes, and a work table or sawhorse provides a stable surface for working on the screen frame.
Screen materials and supplies
Replacement screen mesh comes in two primary materials: fiberglass and aluminum. Fiberglass is more common, less expensive, and easier to work with for DIY repairs. Rubber spline is the cord that holds mesh in place within the frame groove and comes in standard diameter sizes (typically 5/32 inch for residential screens). Always use fresh spline when re-screening, as old spline won’t seat properly. Fiberglass mesh typically comes in 36-inch or 48-inch rolls. Measure your frame width and height, then add 2 inches to each dimension to ensure sufficient material for proper installation.
Step 1: Remove the Sagging Screen from the Frame
Begin by removing the entire screen from its mounting by unbolting or unclipping the frame from hinges or mounting brackets. Take photos of the mounting configuration before removal to prevent installation confusion later. Place the screen frame on a clean, flat work surface such as a sawhorse or table.
Inspect the frame for visible damage before proceeding. Use your pry tool to gently lift one corner of the old spline, then pull it out by hand with steady pressure. The old spline should come out in one continuous piece if the frame is in good condition. Once the spline is removed, pull the old mesh away from the frame and discard both. Inspect the spline groove for debris, corrosion, or damage. Clean the groove with a soft brush and mild detergent solution, then allow the frame to dry completely.
Step 2: Assess Damage and Clean the Screen Frame
A thorough inspection determines whether the frame is salvageable or requires replacement. Look for visible bends, cracks, or severe corrosion. Minor dents that don’t affect the frame’s square geometry are acceptable.
Inspecting for structural issues
Check frame squareness using a carpenter’s square or by measuring diagonals. Measure from one corner to the opposite corner, then measure the other diagonal pair, both measurements should be identical. If they differ by more than 1/8 inch, the frame is out of square and will produce uneven mesh tension. Examine the spline groove along the entire perimeter; it should be clean, free of cracks, and consistent in depth. Check aluminum frames for corrosion, white powdery deposits or rough patches indicate oxidation. Light corrosion can be cleaned and treated, but severe corrosion that has created pits compromises structural integrity and requires replacement.
Cleaning tracks and porch components
For porch screens with sliding tracks, clean the tracks thoroughly using a soft brush and mild detergent solution. For stubborn buildup, a plastic scraper works without damaging the aluminum. Rinse all components with clean water and dry completely. Inspect hinges and mounting hardware, cleaning corroded hinges with a wire brush and applying a light coat of silicone lubricant. Replace hinges that are severely corroded or bent.
Best Screen Spline Tool and How to Use It
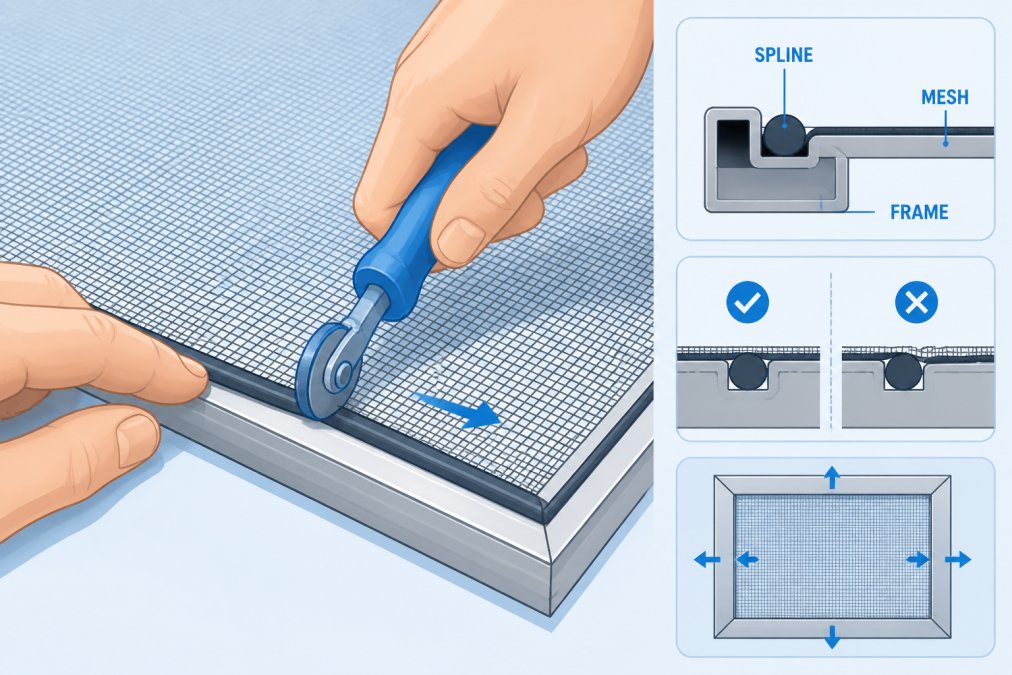
The spline tool is the single most important piece of equipment for successful screen repair. Standard spline tools have two ends: a concave wheel end for pressing spline into the groove, and a flat end for trimming excess spline. The wheel diameter should match your spline diameter, typically 5/32 inch for residential screens. Entry-level spline tools are adequate for occasional use, while professional-grade tools provide better control and durability.
Begin at a corner of the frame, positioning the concave wheel in the spline groove with the new spline just in front of it. Apply downward pressure on the tool and roll it forward slowly, pressing the spline into the groove as you move. Maintain consistent pressure throughout the installation, varying pressure creates weak spots where the mesh can pull free. When you reach a corner, stop a few inches before it and wrap the spline around the corner by hand, then continue on the next side. After pressing the spline around all four sides, trim the excess with the flat end of the spline tool or a utility knife. Once the spline is installed, gently press the mesh against the frame to ensure it’s seated properly, the mesh should be smooth and evenly tensioned with no wrinkles or loose areas.
How to Replace Porch Screen Mesh Properly
Mesh replacement is the core of any screen repair. Proper technique ensures the mesh stays tight and functional for years.
Choosing fiberglass vs aluminum mesh
Fiberglass mesh is the standard choice for most residential screens, it’s less expensive, easier to cut and install, and provides adequate insect protection. Aluminum mesh offers superior durability and clarity, resists UV degradation, and maintains flexibility longer, but costs 2-3 times more and requires more careful handling. For patio screens in full-sun Arizona locations, aluminum mesh justifies the additional cost because it extends the interval before the next replacement.
Measuring and cutting new screen material
Measure the frame’s interior width and height, then add 2 inches to both dimensions to allow for proper overlap when installing the spline. Cut the mesh on a clean, flat surface using a sharp utility knife and straightedge. Make a single smooth cut rather than multiple passes, as multiple cuts create rough, irregular edges. Lay the cut mesh over the frame, centering it so excess material overhangs evenly on all sides with no wrinkles.
Securing mesh and trimming excess material
Begin pressing the spline into one corner, then work along one side toward the opposite corner. Keep tension on the mesh with your free hand, pulling gently to maintain flatness. Once the spline is fully installed around the perimeter, trim excess mesh with a utility knife flush with the outer edge of the spline. Inspect the completed screen for wrinkles, loose spots, or uneven tension, the mesh should feel uniformly firm with slight give.
Cost to Rescreen a Porch: What to Expect
The cost of rescreening varies significantly based on screen size, material choices, and whether you DIY or hire a professional. A DIY repair requires purchasing a spline tool (one-time investment), replacement mesh, spline, and potentially frame repair materials. A professional rescreening service handles removal, installation, frame inspection, and disposal, with labor comprising the majority of the total cost. Most professional services provide free estimates.
The decision between DIY and professional typically comes down to time and confidence. A DIY repair takes 2-4 hours for someone working carefully for the first time. If your time is valuable or you’re uncomfortable with the process, professional installation provides peace of mind and typically includes a warranty.
SPARKLE TECH SUN SCREENS offers free quotes and same-week service for Phoenix and Scottsdale homeowners. Their team handles custom measurements, material selection, and professional installation, backed by a lifetime guarantee on qualifying services.
When to repair vs replace
Repair is economical when the frame is structurally sound and only the mesh and spline need replacement. If the frame is bent, corroded, or out of square, replacement is more cost-effective than repair. A screen that’s 8+ years old has likely experienced significant UV degradation, and repeated repairs become necessary as the mesh continues to fail. New screens eliminate the cycle of recurring repairs.
Common Mistakes to Avoid When Fixing Sagging Screens
Installing spline without removing all old spline first. Old spline hardens and doesn’t compress properly. Always remove the entire old spline before installing new.
Using mesh that’s cut too small. Insufficient overlap prevents proper spline seating. Cut mesh generously, with 2 inches of overlap on all sides.
Skipping frame inspection and cleaning. A dirty groove prevents spline from seating properly. Spend time cleaning and inspecting before beginning the repair.
Applying inconsistent pressure when installing spline. Varying pressure creates weak spots where the mesh isn’t fully secured. Roll the spline tool at a steady pace with consistent downward pressure.
Reusing old spline. Spline hardens and becomes brittle over time. Always use fresh spline.
Rushing the corner installation. Take time to wrap spline manually around corners rather than forcing it with the tool to prevent bunching and ensure proper seating.
Not checking frame squareness before beginning. An out-of-square frame produces uneven mesh tension. Measure diagonals before starting.
Installing mesh with wrinkles. Wrinkles become permanent and create weak points where the mesh tears under tension. Keep the mesh flat and smooth as you install the spline.
Sagging patio screens reduce airflow, compromise insect protection, and detract from your home’s appearance. The repair process is straightforward when you understand the underlying cause and follow proper technique. For homeowners seeking professional-grade results without the learning curve, SPARKLE TECH SUN SCREENS provides custom rescreening services with premium materials, expert installation, and a lifetime guarantee on qualifying services. Their team handles measurements, material selection, and professional installation for Phoenix and Scottsdale properties. Contact SPARKLE TECH SUN SCREENS for a free quote and experience the difference professional screen solutions deliver.
Frequently Asked Questions
Can you tighten a sagging screen without replacing the mesh?
Yes, if the frame is still sound. You can re-tension the existing mesh by removing the spline, pulling the screen tight, and reinstalling the spline. However, if the mesh is torn, faded, or brittle from Arizona sun exposure, replacement is more effective. For mesh older than 3-5 years in our climate, replacement typically provides better long-term results than re-tensioning alone.
What's the difference between fiberglass and aluminum screen mesh?
Fiberglass screen is softer, quieter, and easier to repair by hand, making it ideal for DIY fixes. Aluminum mesh is more durable and resists tears better in high-traffic areas, but it's harder to work with and dents more easily. For Arizona's intense sun and dust, aluminum offers superior longevity, while fiberglass works well for seasonal or light-use screens.
How much does it cost to rescreen a porch professionally versus doing it yourself?
DIY costs depend on materials: expect $50-150 for mesh, spline, and tools for a single screen. Professional rescreening services vary based on screen size and material choice. For pricing on professional rescreening in the Phoenix area, visit our pricing page or request a free quote. Professional installation includes custom measurements, proper tensioning, and durability guarantees that DIY repairs typically don't offer.
How long does a repaired or replaced screen last in Arizona's climate?
Well-installed fiberglass screens typically last 5-7 years in Arizona's heat and sun exposure. Aluminum mesh lasts 7-10 years or longer. Factors like UV intensity, dust storms, and temperature fluctuations accelerate wear. Screens installed with proper tensioning and quality materials, like those backed by a lifetime guarantee, perform significantly better than standard repairs, especially in extreme sun and wind conditions.
This article was written using GrandRanker